
Index
Here are quick links to each section. If you don't know where to start, go to Downloads.
Downloads
Video
Transcription
Compressor Controls
Threshold
Ratio
Attack
Release
Example Settings
FIN (comment section)
Downloads - Start Here
Download the FREE Compressor Cheatsheet for an easy, one-page summary of compressor fundamentals.
Note: the PDF above is A4 sized & optimized for web.
For a great looking printout and files good for print, please go to the shop.
Print & plaster it on your wall, gift it to your producer, make it your phone background, whatever.
If you want to go deeper and really get a feel for each compressor control, then download this drum loop and free compressor to follow along with the video below!
Drum Loop (Right click ‚ --> Save Link As)
- Free ReaComp Compressor VST (Have to download entire pack, but it's a small download)
Video
Video embed will go here
Transcription
Welcome to this video, you are very brave. I'm going to help you get a feel for how a compressor works without making it complicated. You're intuitively going to know what the controls do.
I'm also gonna link you to one of the best sounding free compressors and give you a couple example settings for adding punch and thickening your tracks.
Let's do it.
First we'll cover the fundamentals of compression:
- what compression does
- common compressor controls & what they mean
What is compression?
It changes the shape of audio signals by reducing volume. This 'reducing volume' is also called gain reduction. Same thing. The two most common uses of a compressor are to make audio punchier, and to make audio 'thicker' or more even.
So say we want to make our drums punchier. How do we do this by reducing volume? We leave the volume alone for the initial drum hit, then we reduce the volume right after. Then bring the volume up just in time for the next drum hit. This gives you a punchier sound.
We can also make the drums sound more even, or thicker or fatter if you like. For this, we turn down the volume for the initial punch/ poke of each drum hit and turn the volume back up to normal quickly. This will smooth out the initial hit of the drums, leaving you with a more even signal with more body. The drum tone stays present or sustains for a longer time
So, how do we make a compressor do this for us?
COMPRESSOR CONTROLS
To understand compression, we just need 4 simple controls. I recommend you follow along, there are FREE download links for the drum loop and compressor in the description and also a handy and beautiful Compression Cheatsheet with all this info on it, but if you just wanna watch that's cool too we're gonna learn regardless.
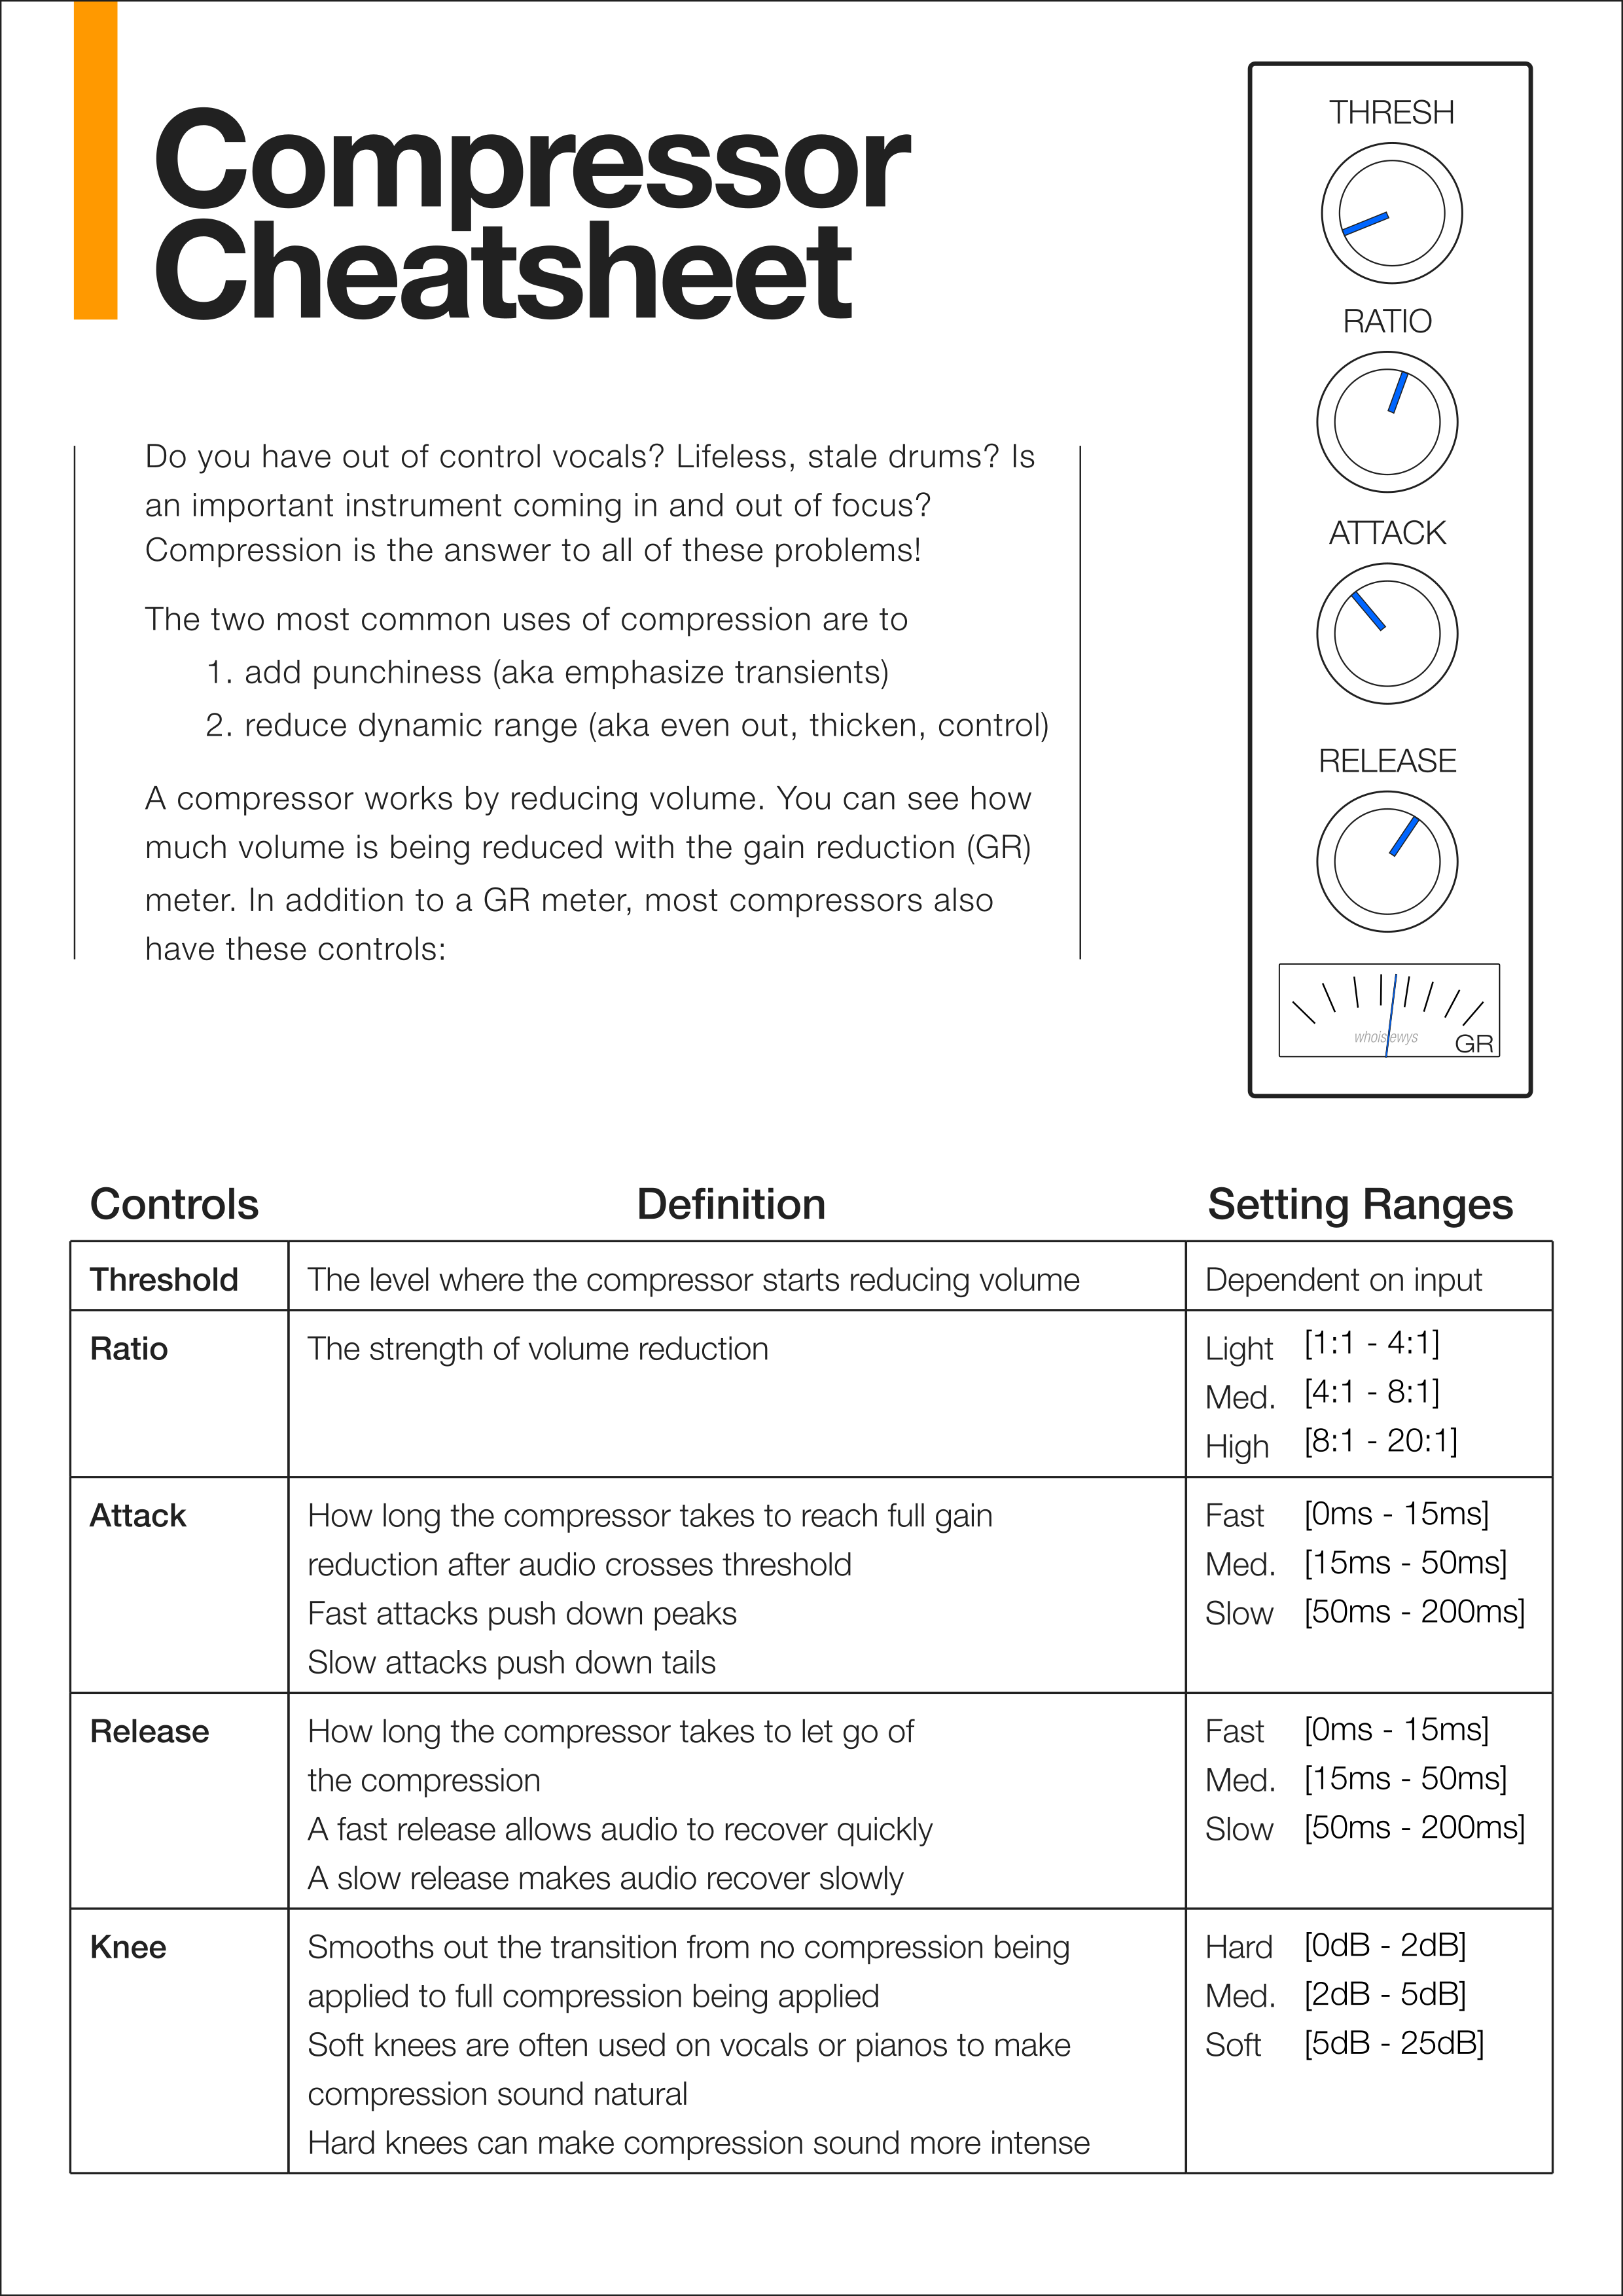
Threshold
- When input audio crosses this level, the compressor can begin reducing audio
- Ex: I set the threshold to -18db. When the audio reaches -18db or higher, the compressor knows it can start lowering the volume.
Ratio
- The strength of the compressor's volume reduction
- Ex. 1:1 ratio - 0 strength. Doesn't do a thing. 3:1 ratio, audio gets pulled down a bit. 10:1 audio gets pulled down strongly when it goes above the threshold.
- Ratio numbers: Between [1:1 - 4:1] is light ratio, somewhere around [4:1 - 8:1] is medium ratio, [8:1 - 20:1] is pretty high ratio
Attack
- How quickly the compressor starts working
- Ex. 50ms attack time. When the audio crosses the threshold, the compressor waits 50ms, then reduces the volume of the audio.
- Intuitively, Faster attack times will push audio peaks down, slower attack times will push tails down.
- Attack Numbers: fast attack time is [0ms - 15ms], medium attack time [15ms - 50ms], slow [50ms - 200ms]
Release
- Tells the compressor when to let go of its compression.
- It controls how fast the audio recovers from the gain reduction. It controls how fast the audio bounces back from the gain reduction.
- Fast release times let your audio 'recover' from compression faster. Slower release times keep your audio 'held down' for longer, or keep your audio squashed for longer.
- Fast release time [0ms - 15ms], medium attack time [15ms - 50ms], slow[50ms - 200ms]
- Full Example: Choose a release time of 100ms. Audio crosses threshold, compressor waits 50ms of attack time, compressor reduces volume, the volume reduction is held down for 100 ms, then volume goes back to normal.
That's all the controls. Not that scary right? Let's apply our knowledge and wrap this little lecture up with some example settings for punch and settings for thickness / even-ness
Settings!!!
Alright so the theory is great. But what numbers should I look for?
If I want to make my vocals sound thicker and more 'in your face,'
If I want to make bone crushing drum sounds how do I do that?
Real quick, it all depends on the track. So DO NOT just copy my settings here. Use them as a starting point. The only way to master compression is learn what the controls do and play around.
Also, make sure you like the balance of all your tracks. If the volumes of your tracks out of a wack, compression will not help! Get a balance you like just by adjusting the faders.
Alright that said, let's get to the settings.
Add Punch: Medium Attack & Medium & Slow release
Lots of people talk about using compressors to add punch. Here are some typical settings and what it sounds like.
We're gonna look for 10db of gain reduction on our meter right here.
We're gonna use an 8:1 ratio to really clamp down on the drum sound after the initial hit. We've got an attack time of 20 to reduce the tail right after each hit, and release of 150 so the volume recovers a bit in between hits.
Finally, threshold depends on the volume of your input audio so I'll just set to wherever I start seeing around 10db of gain reduction.
This probably isn't something you'd want to send out, but I'm making the effect very dramatic to demonstrate what 'punch' sounds like from a compressor.
Hear how the medium attack time lets the very beginning of each drum hit through? If I reduce this the drums get clickier and clickier. If I slow down the attack, we start getting this weird sound. But right about 15-40 we get these nice beefy drum hits with little tail. You might wanna set this smaller for a faster tempo song, or larger for a slower tempo song.
Thickness / Even-ness: Fast Attack & Fast Release
We're gonna look for around 5db gain reduction.
Ratio we're going 4:1, attack 0.3ms, release 20ms.
Again, threshold depends on your input volume.
Hear how these really fast attack and release times will squash the initial hits of the drums and leave them with a lot of sustain
This makes the drums less pokey, more controlled and fatter. This also allows you to bring the volume up louder than you could have before compression.
One Last Note
One last note, It's human nature for us to think louder is better.
So when you're trying out different compressor settings be careful to not just toss a compressor in just because it makes your audio louder. A lot of presets do that.
Check meters in your DAW, listen carefully, and toggle the compressor on and off to make sure the volume is THE SAME before and after compressing.
FIN
Congratulations! That's all the fundamentals of compression, with some solid settings to get you started. Have fun with it
There is one common setting we didn't discuss cause we need to understand the others first: knee.
It can make compression sound more natural. If you want to know how it works, There's a link in the description to an Ableton Forum thread that describes it beautifully and simply - it's also described briefly in the Compression Cheatsheet.
Leave a like if you liked, if you have a question or a request or you think I suck leave a comment, if you'd like more subscribe to the channel. That's it Peace! 😊
- Luis 2018.05